Pages

Wednesday, February 29, 2012

02/28/12 - Stash Update

So, I took some stash update pictures a while ago. And never did anything with them. So I took some new ones and here they are.

Here are my polishes in their little drawer, and my two "nail wheels."


Here's a closer-up picture of just the polishes. Gettin' pretty full already. I could probably use advice on better ways to store my nail polish.


And here are my two "nail wheels." I finally just recently completed the second one, a new neon orange being my most recent purchase.
I should probably count how many polishes I have, just so I have a number. Haven't done that yet..

Tuesday, February 28, 2012

02/25/12 - Neon Criss-Cross


Hello all! Long time, no posts - sorry! Been busy, and loved my last nails, so I didn't change it until Friday night/Saturday morning. Yeah, I finished these at about 3:30 am. I finally did it then because I was in a Senior Fashion Show at my school all day Saturday, and 'cause on Friday my thumbnail broke and beheaded
Mickey. Sigh.
Well, as you can see, this isn't a particularly unique nail design, but I wanted something fairly easy to do with some sparkles, and, ta-da. Some other blogger recently shared this design in the colours she chose, and I chose similar colours except I used all neons. I might have done it in a different order, too. I don't really know, I just remember in the back of my mind seeing someone do something like this.
So the polishes are Love&Beauty - Neon Yellow, L&B - Hot Pink, Klean Color - Neon Aqua, and the green is both L&B - Neon Green and Sinful Colors - Irish Green. The white is a Migi Nail Art Pen, and the sparkles are just the small sparkles from Santee - Moon Light Glitter.
Fun, bright, simple. :)

Wednesday, February 15, 2012

Swatch: Glitter Gal - Silver 3D Holographic

Okay, I know in my last post I talked about how much I love this polish, but now I'm going to talk about it more! I have an excessive number of pictures, so I'll try to make them smallish so they don't kill anyone's internet.
I got this Glitter Gal polish from Llarowe, which is the only place I saw it. If you Google it, you can see other people's swatches of it (ex), and their swatches are the reason I decided on this particular silver holo. But here are my own pictures. :)

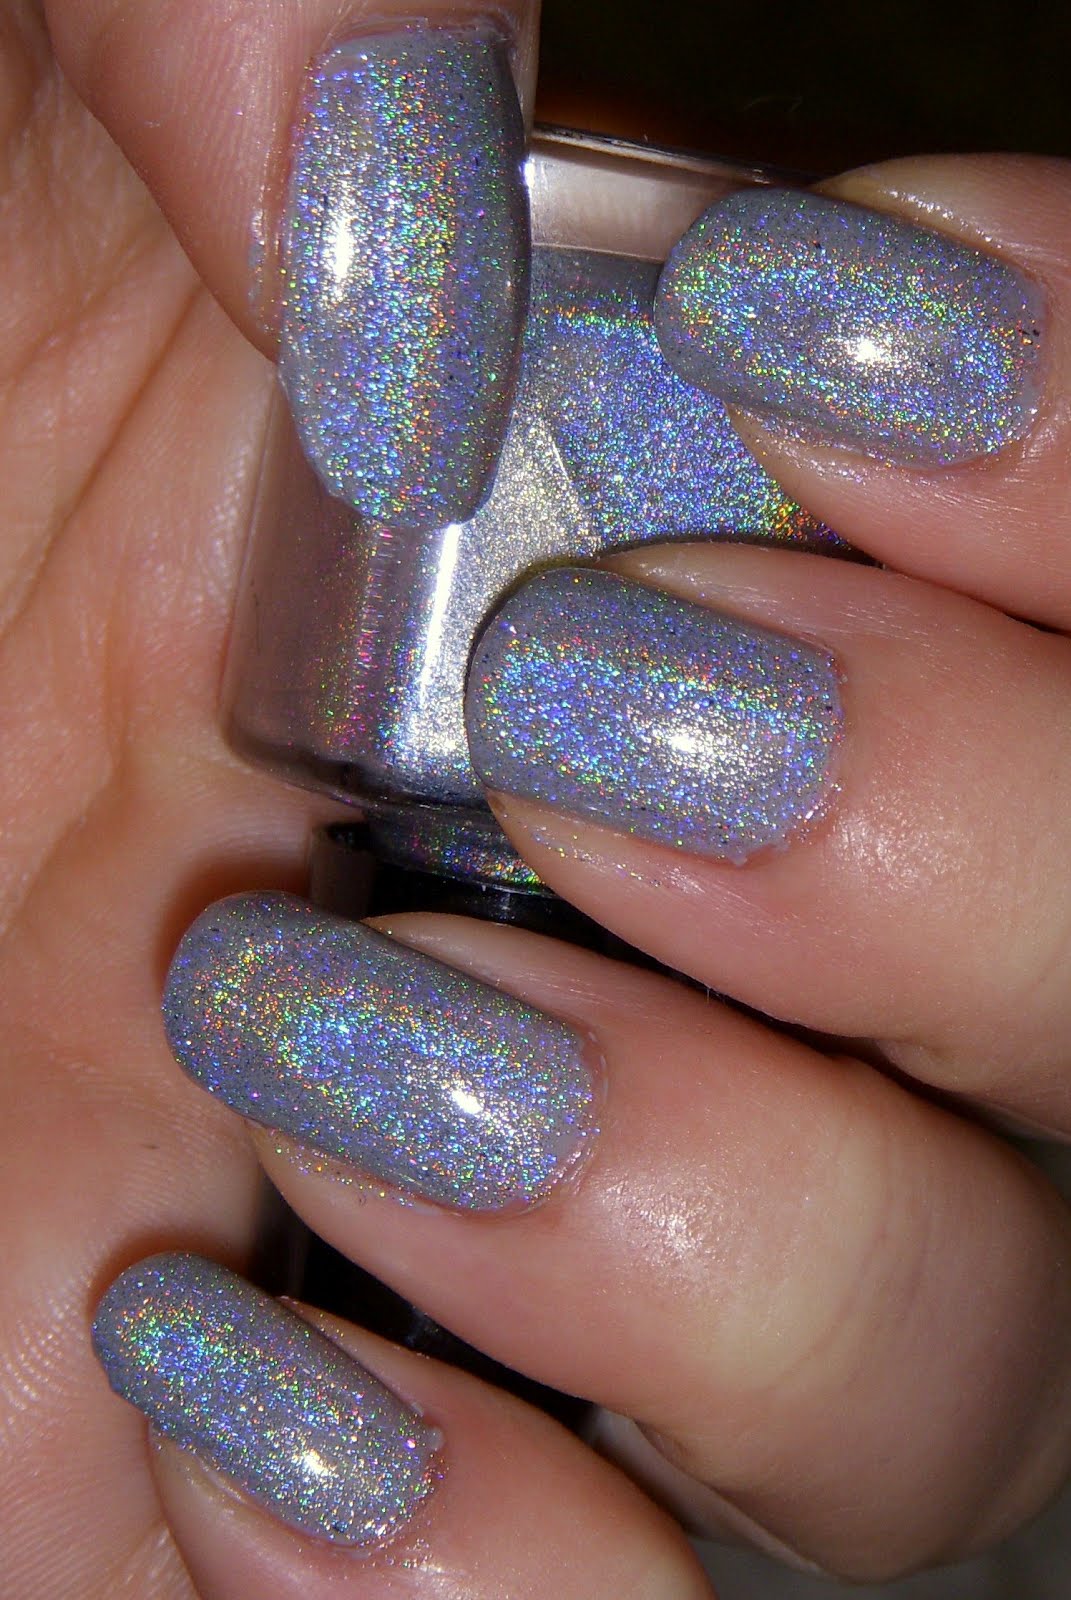
Here are two pictures of the bottle. Ah-mazing already, right!?

I always test my polishes on paper first. I went ahead and tested it over a random polish I had already on paper - which happened to be Wet Cement. I was a little worried it wouldn't work, for a couple reasons. 1) Directly on the paper, it wasn't appearing very holographic. 2) I was so SO excited for this, and it's just like life to make you disappointed. But disappointed I was not! It's even amazing not on my nails.

And then I put it on my nails. This is one coat of Silver Holo, over one coat of Wet Cement.
The formula is beautiful, by the way. I don't know if I'd try to do it on its own, since I've heard you need four coats for opacity, but it doesn't streak and glides on beautifully. No special base coat or top coat required. :)


I started on my first nail, my left thumb. Blown away! It was like putting magic on my fingers. Instantly it started looking holographic and awesome. I was thrilled!

Here's another view of my thumb, as well as the bottom of the bottle (though you can kind of see I've now done all my nails). As you can see, every tilt in the light unleashes another burst of rainbow awesomeness. By the way, all photos thus far have been without flash.

Here's the whole hand with the bottle, with flash. Flash may not be the perfect lighting to show off the awesomeness, but still. Awesome.
Since I just got it, I've only used it for my Valentine's Day mani. You can also see a picture I took in the sunlight (with the design) and my comments on it there.
This glows and sparkles and holographs (is that a word :P) and emits rainbows and awesomeness exactly as I would wish it too. I haven't done too much on trying it over other colours yet (though have determined it looks less awesome over white and gets a little confused when painted over a regular sparkly silver) but this pairing with Wet Cement definitely looks awesome. Great polish! Highly recommend!

Swatch: Sally Hansen - Wet Cement

I enjoy this polish. Wet Cement is a nice, slightly warm tinted grey. No shinies, sparklies, glitzies. It's exactly what I wanted it to be when I bought it. :)

Here is one coat with its bottle - it is part of the Hard as Nails branch.

Here's a close up of one finger (this is no flash, indoor lighting). You can see that even with just one coat and no top coat, it is thick (but not too thick), shiny, and smooth.

And here it is with flash. This is a lot cooler than the polish actually appears. The last two picture are more colour accurate.
I've used this before in my Valentine nails, my sock nails, my rainbow dotted gradient nails, and in the tail feathers of my Thanksgiving nails. :)
But yeah! I definitely give this polish a positive review. I wasn't sure when I bought it - I was searching for a plain, not silver, grey, and was a little worried this would be too warm. But nope, this is just about perfect!

Tuesday, February 14, 2012

02/14/12 - Happy Valentine's Day!

First of all: happy Valentine's day! I hope you all are having a great day and are thinking of happiness, love, and peace.
Second of all: I love, love, LOVE the nails I did for this occasion! My favourite that I've ever done. So excited!

Here it is! I decided to celebrate an iconic relationship - that of Mickey and Minnie Mouse. :D On my fingers are alternating hearts and the mouse head - though they ended up looking similar so, meh.
But my thumbs! I'm so proud of how they turned out.
All the designs are done with Migi Nail Art Pens, except for the face flesh colour which is done with Love&Beauty - Taupe. And, of course, that background colour! OMGGGG! xD I love it. I have been wanting a silver holo for basically as long as I've known there was one (over a year). Finally last week I ordered Glitter Gal - Silver 3D Holo, and I am NOT disappointed! I love it! I did paint it on over Sally Hansen - Wet Cement, because this polish is known to definitely not be a one-coat polish. Since it's such a little bottle and so amazing I didn't want to use 2-4 coats to reach opacity, and my tests on paper found that it looks amazing over Wet Cement. I have an extra long swatch post planned for this holo!
Here is a closer picture of my fingers, as well as the only sunlight picture I really liked of the holo. I found that even in artificial light it looked amazing, and the pictures weren't really capturing anything beyond even in the sunlight. But I think it's great. :)


So to conclude this post, Happy Valentine's Day! Please let me know if you love my nails as much as I do. I've been showing them off all day. :D

Friday, February 10, 2012

02/05/12 - Niece's Nails!

Prepare yourself for a super adorable post. :D
This past weekend the plan was for me to go over to my boyfriend's house because his four-year old niece was visiting. She absolutely adores me, and of course, she's adorable. So DBF asked her before I came over if she'd like me to paint her nails. So her face lit up and she got super excited and asked me to bring over red, blue, and purple. So I packed up basically all of my red, blue, and purple nail polishes, and had a sneaking suspicion that I should also grab my sparklies. I let her choose what she wanted, and this is what happened!


Pardon the dirty little girl feet, but she loved her toes. Sparkly and blue? How great! (This is Nail Treats - Jubilee over Santee - Sky Blue.)


Then came her hands. She changed her mind at least a dozen times, but when I told her that the polishes she seemed to be favouring were for drawing pictures instead of painting the whole nail, she wanted flowers. And polka dots. And stripes. I asked if she wanted it over a coloured background but she just wanted it over clear. Her nails are so tiny! But she was so, so, SO excited when I was done. :D
Her favourites were her thumbs. I didn't get any good pictures - even as patient as she is, she was a little squirmy and didn't understand why I wanted to take pictures - but what matters is that she likes them. :)
Overall, it was a great day, and she was thrilled!

Thursday, February 9, 2012

Swatches - SH Platinum and CG Princess Grace

As I mentioned a little while ago, I want to try to doing swatches any time I use the same background for all my nails.
This one I debated not doing, because I painted Sally Hansen - Platinum thinly, because I knew I was going to cover it up. But I'll post what I have anyway. :)


So here's Sally Hansen - Platinum. So sorry I forgot to take pictures of the bottle. But this a cool polish. Not quite sure why it's called platinum, because when I hear "platinum" I think of a silver coloured metal. This is more like less-rainbowy opal. (Linked pics are not mine and are found on Google.)
Platinum was actually what I used in my very first mani that I took a picture of. :) I don't think I've actually used it since, until my feather mani. Oh wait, it was the wings in my Christmas angel. :)


And here it is with China Glaze - Princess Grace. I have used Princess Grace many times as a polish over another polish. It's super thin, which would seem like a downfall, but it can be fun because then I can layer it over any polish to give it a white gloss without cancelling its colour.
So I've done so in my feather mani, my leaf mani, my failed heart mani, and my teddy bear mani. :)

Here's a close up of my thumb - you can kind of see both colours in this. Princess Grace does have the slightest hint of pink, but I think that's really the Platinum showing through here. :)

Wednesday, February 8, 2012

02/04/12 - Feathers in the Polish


Hello all! It's been a little while.
Here's something I've been wanting to try for a while: feathers! When I did my leaf mani, I had always planned to eventually do feathers as well.
So here you see red, yellow, blue, green, and purple feathers over Sally Hansen - Platinum and China Glaze - Princess Grace.
After I did the first two nails I almost gave up, because it wasn't going how I wanted it to go. But I had been planning this for so long I decided I should finish, and I'm glad I did. It's not perfect, but I do like it.
The colour order was decided on the basis that I did not want yellow next to purple, purple next to red, or red next to green. Then I did a different order on each hand that wasn't simply a reverse of the opposite. xP
Here are some close ups:

Let me know what you think! :)