Pages

Saturday, June 30, 2012

06/26/12 - Bright and Colourful Nails

So this was an idea I've had bouncing around in my head for quite a while. Unfortunately, I don't love it quite as much as I'd hoped, but it's alright. :)
So as you can see, it's a bunch of assorted colour dots, then a v-shaped tip of neon yellow, with a small tip in neon pink (which looks somewhat neon orange over the yellow). I wanted it to be bright, colourful, and neon (I love the neon trend!) and it is all those things - I'm just not sure the rainbow dots actually mesh well with the neon tips. Oh well.
The dots are mostly a bunch of colours from Migi Nail Art Pens, except for the purple and teal which are from Sally Hansen Nail Art Pens. Love & Beauty - Neon Yellow is layered over a thin coat of Claire's - Snowball for extra pop, but if I did this again I probably wouldn't have done the white. Then the very tips are a Cina Nail Art Pen.
The V's are created using tape. I don't have great success with tape manicures, and this was no exception.
But it's fun, and here it is. :)

Tuesday, June 19, 2012

Swatch: Love & Beauty - Neon Green

This is a nice green that's exactly what it's supposed to be. :)
 
 These two pictures above are with flash. As you can see, it's another Love & Beauty (Forever 21) brand polish, which all cost a measly $2.80. Over white, it is definitely a neon. On its own over my nails, it's kind of a nice spring green. I didn't realize this before, but it's nice. When I want the neon, I've got it. When I want a subtler look, I've got it. :)
 
 
This is only two coats. You can still see some VNL, I know, but it suited my purposes at the time.
I've used it before in my Summer Sunflower nails, Neon Criss-cross nails, Forest nails, and Patterned Neon nails.
But yup! It's a pretty typical neon green nail polish. :)

Sunday, June 17, 2012

06/16/12 - Summer Sunflower Nails

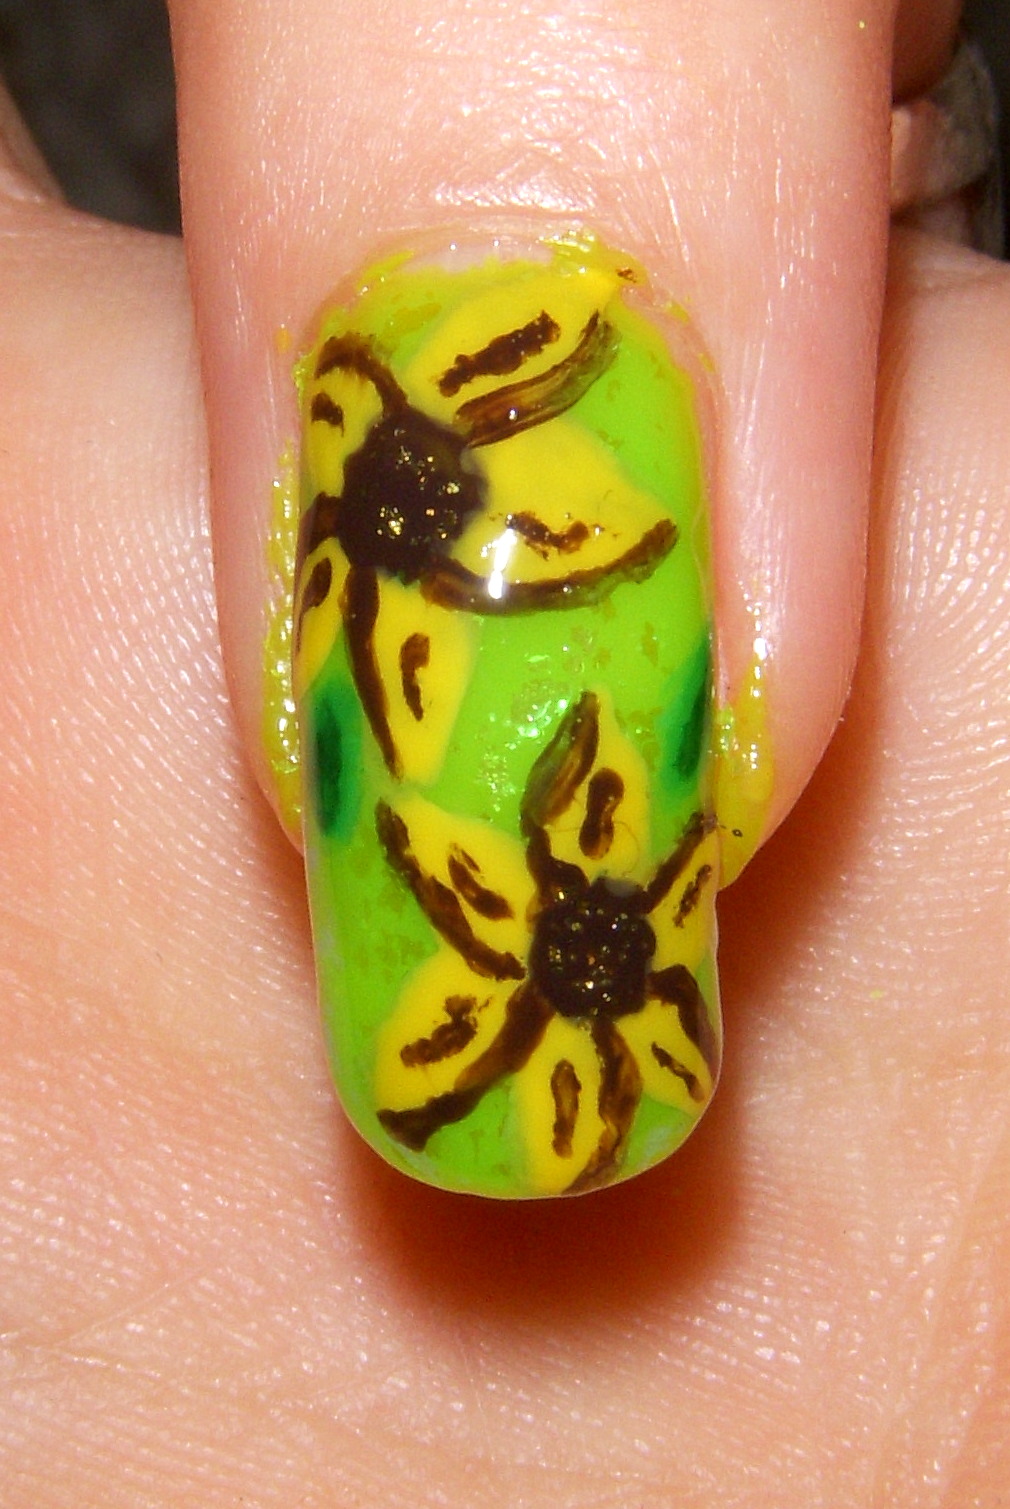
So I decided to follow a tutorial for these, just because I saw LOVE4NAIL's design and thought it was really pretty, and I'd been wanting to try flowers like these for a while. Of course mine isn't exactly like hers, but I like it well enough. :)
 
Here they are outside. I forgot to change the white balance, so my fingers look really weird, but the colours of the nails aren't that off. Just in case, here they are inside with flash:
 
Some detail shots: (I believe this is left middle finger and left ring finger)
I used Love & Beauty - Neon Green for the base, with a coat of Essie - Opal for some shimmer, Revlon - Hot for Chocolate for the brown, nameless cat polish for the gold sparkles in the flower centres, a mini red from Icing for the lady bug wings, Wet 'n' Wild - Ebony Hates Chriss for the black, Love & Beauty - Green for the leaves, and Sinful Colors - Last Chance for the leave centres. All the details were done with my littlest paintbrush, though I realized watching the tutorial that I really need smaller paintbrushes! Add trip to Michael's to the to-do list..
I tried several times to capture the Essie - Opal here. It's this lovely green/pink flakie polish. Putting it over green can seem quite silly, as the pink aspect nearly disappears, but I think it adds a nice subtle shimmer below the design. Here's my attempts to make it show up on camera:


But yeah! If I were to try again, I would have a lighter brown (this is my only brown) and a smaller paintbrush. I might also put white behind the wings of the lady bugs, since sometimes they don't look as red as they are.
But I was looking for a design that looked nice and summery and maybe had flowers, and this one fit the bill. :)

Wednesday, June 13, 2012

06/07/12 - Graduation Nails!

Okay, there are going to be a bunch of pictures in this post!

I graduated high school on June 7th, 2012. :) My school colours are maroon and gold, so I did a French with maroon tips with goldenrod lettering that says "Class of 2012" across my nails, with the grad caps (which I've been told are mortar boards) on my thumbs, with the tassel one way on one and the other on the other, to represent the turning of the tassel (I later learned that we turn the tassels right to left, not left to right, but oh well.)
 
The polishes used were China Glaze - Seduce Me for the maroon, Migi Nail Art yellow for the lettering and tassels, Wet 'n' Wild - Ebony Hates Chris for the outline of the grad caps, and mini Sugar & Spice unnamed polish that had a pink tinted base and a bunch of sparkles in it. :)

Here's a close up of the mortar board on my left hand. :)

I also painted my toes to match my dress. I kinda went with the idea of matching my nails to the theme and my cap and gown, and my toes with my dress.
 
The white is Claire's - Snowball, the black is WnW - Ebony Hates Chris, and the dots are Migi Nail Art Pens. There's a coat of Sally Hansen - Diamonds over it.

And here's a picture of me before the ceremony:
Weee, I'm free!

Friday, June 8, 2012

Swatches: Love & Beauty - Taupe

So I bought this polish at Forever 21 while ago, looking for a nude nail colour. I love it! It works perfectly for being a nude nail colour and it just looks lovely. And the formula is good, too.
(Warning, pic-heavy post!)
As you can see - Love & Beauty - Taupe. A great steal at $2.80 (which, I believe, is the price of all the Forever 21 polishes). The thing I love about this is that it goes with my skin very nicely, but it also has the tiniest hint of a purplish pink shimmer, which only shows in some lights, but just adds a bit of magical touch.

First photo without flash, second photo with. You can just barely see the shimmer here.
This is just one coat, and while you can see VNL, it's not bad. Two coats would probably finish it up perfectly if you wanted to wear it by itself.

Looks very classy. :)

Some close ups without flash, trying to show the shimmer. I think you can see it best in the photos with flash, but still. It looks very nice.

I've used this polish before in Unnoticeable nails, Valentine's nails, Happy Holidays nails, Forest mani, Halloween nails (Halloween costume), and Halloween mani (Halloween themes).

Anyway, I highly recommend this polish for anyone looking for a skin coloured nail polish with a little bit of secret fun. :)

05/19/12 - Unnoticeable Nails

So as I mentioned in my MIA post, I was in a musical. I was John in Anything Goes, and as such, I needed nails that wouldn't be noticeably painted from the audience. However, I didn't want to leave them blank.
I ended up trying to cram this thing into about two hours, in between work and the next performance, and so it was horribly rushed and immediately got very dented/marred when doing my hair before the performance. So this turned out like crap, yet I kept it for two weeks any way (all the performances).

I never even ended up putting a top coat on the ring finger. xP
It was supposed to be a lovely nude polish (Love&Beauty - Taupe), with a subtle gradient with Sally Hansen - Platinum, and then a dotted flower design in white (Migi Nail Art Pen) on the accent nail. It.. kinda worked out that way.
It was nice and subtle and served its purpose well. Too bad it looked like crap, with rushing it and trying to do my hair and make up well before it was dry.

Wednesday, June 6, 2012

Swatch - Simply Sweet blue

I got a Simply Sweet 4-pack for $4.99 at Ross a couple months ago. None of the polishes have specific names, just the brand name and the ingredients on the bottle. It came with this blue, a light yellow, a light pink, and a pink. This is my favourite of the bunch.
It was hard to get colour accurate pictures, but as you can see, it's a nice sky blue.

It's shiny without top coat. This is two coats, and it actually had a pretty good consistency. I had problems with the light pink and yellow ones. But this one went on evenly without problems.

If you merge these pictures that's probably the most colour accurate.

Anyway, overall I got a really good feeling from this polish. I've used it before in my Beautiful Day nails and the blue hearts in Heart Failure nails. I think I've been scared to use it since I didn't like the other Simply Sweet polishes I had used, but I won't be scared any more, because I think it came out wonderfully and worked perfectly for my Beautiful Day nails. :)

Tuesday, June 5, 2012

05/12/12 - What a Beautiful Day nails

Okay, day 1 of catch-up!
I LOVED these nails. I really didn't want to take the design off.


This was an idea of of my boyfriend's. He said, "You always do such great, crazy designs that I look at your nails and am all, WOAH, look at that! I kinda wish you would do a simple design, like blue sky and grass or something." So I did just that.

I did a sun, clouds, birds, and grass, all over a lovely blue sky. Then I tried something new - I mattified it! I think it did help the over all look. :)
Here are all the polishes and stuff I used. The blue was an unlabelled polish from a brand called Simply Sweet that I picked up at Ross. The grass was painted on with three different greens: Love&Beauty - Mint, Sinful Colors - Last Chance, and Old Navy - Shamrock. The clouds were sponged on Claire's - Snowball. The sun was a couple layers each of Love&Beauty - Neon Yellow and an unlabelled yellow from Simply Sweet. The birds were Wet and Wild - Ebony Hates Chris. The matte top-coat was Essie's Matte About You.

Like I said, I was very pleased with this. People loved the design, especially the birds. It was fun to do and fun to look at. :)

P.S. With all the changes Blogger has made, I cannot get the images to be in the format/arrangement I want them to be. Grr. Sorry about that.